HOW TO REGISTER & GIVE ACCESS TO MAIL 365 WITH OAUTH 2.0 (IMAP OR POP3 OR SMTP)
Introduction
On October 1st 2022, Microsoft will begin disabling Basic authentication in Microsoft 365 for IMAP, POP3 and EWS. This means that classic username/password authentication will no longer work with Exchange Online, and application will have to be upgraded to use OAuth 2.0.
Microsoft 365 (formerly Office 365) supports two kinds of OAuth 2.0 authentication:
Delegated authentication is suitable for desktop, mobile or web applications with signed-in user present. This mode is described in detail in another article.
App-only authentication is suitable for services or daemons with no user present. Instead, these unattended applications authenticate using client secrets (application credentials) to receive an access token, which is then used to gain access to a mailbox using IMAP, POP3 or EWS protocols.
Before your application can start accessing mailboxes, you have to register it with Microsoft, assign the relevant permissions and configure mailbox access. The guide below describes what needs to be done to enable POP3 or IMAP access for unattended apps (app-only mode). For EWS, see Office 365 and EWS with OAuth 2.0 in unattended mode.
Register yourself and your company
Log into Azure Portal. If you don't have an account there yet, create it. You also have to set up a tenant that represents your company.
If you administer more than one tenant, use
Directories + subscriptionsfilter to select the tenant for whom to register an application.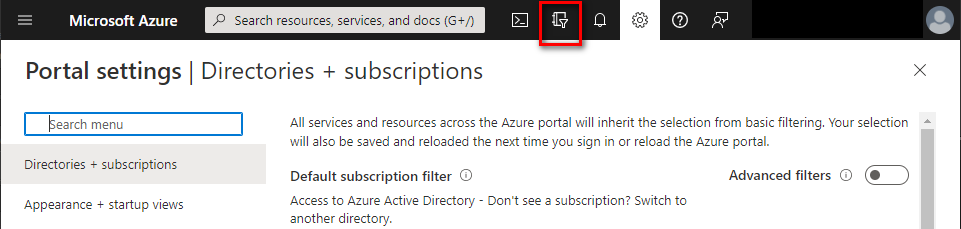
Register your application
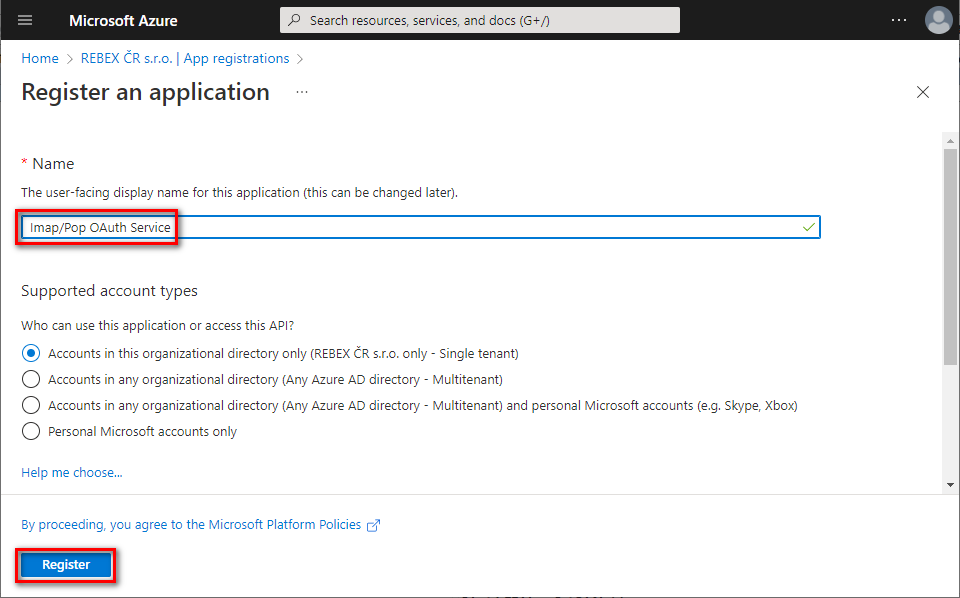
In Azure Portal ⇒ expand the left menu ⇒ select
Azure Active Directory⇒ selectApp registrations⇒ click +New registration. (Azure Portal is constantly evolving, so if you cannot find this page, use the search bar.)
Name your application, choose which kind of accounts are going to use it, and click Register.
Note: This guide is suitable for single tenant account types. For other types, further steps might be different.
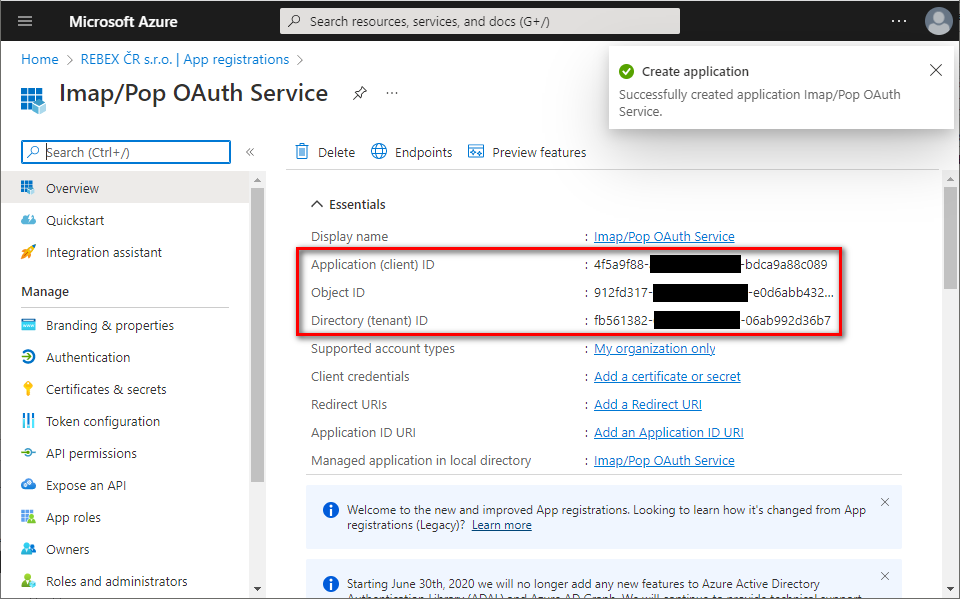
- You successfully registered your application and you can view its associated IDs. Some of them will be needed later to obtain an OAuth 2.0 token.
Set up client secret (application password)
In the left menu, select
Certificates & secrets⇒ click +New client secret.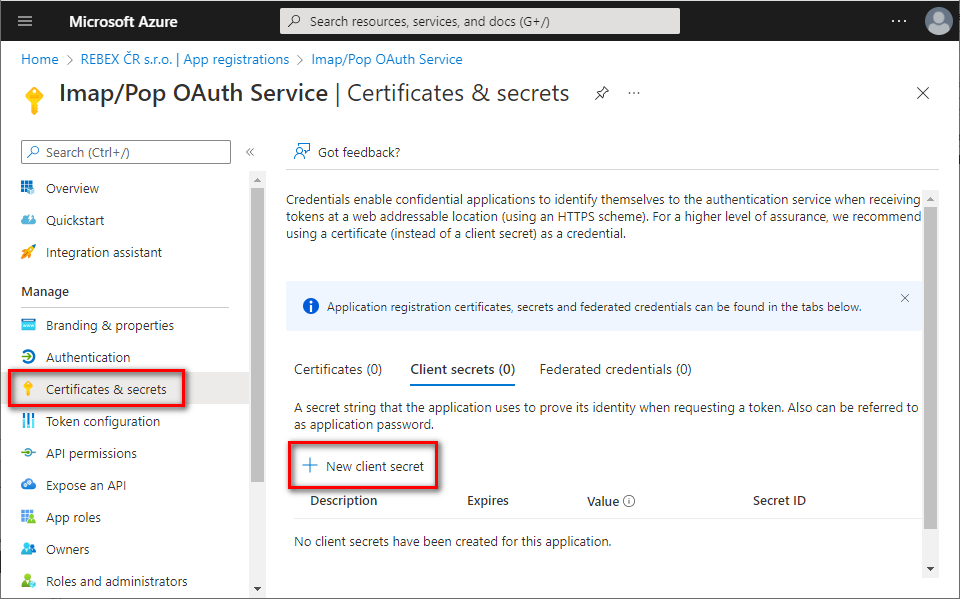
Provide some description for this secret, choose expiration period, and click
Add.
Immediately copy and save the newly created client secret's
Value(notSecret ID). You will not be able to view the Value later anymore.
Add app permissions
In the left menu, select
API permissions⇒ click +Add a permission.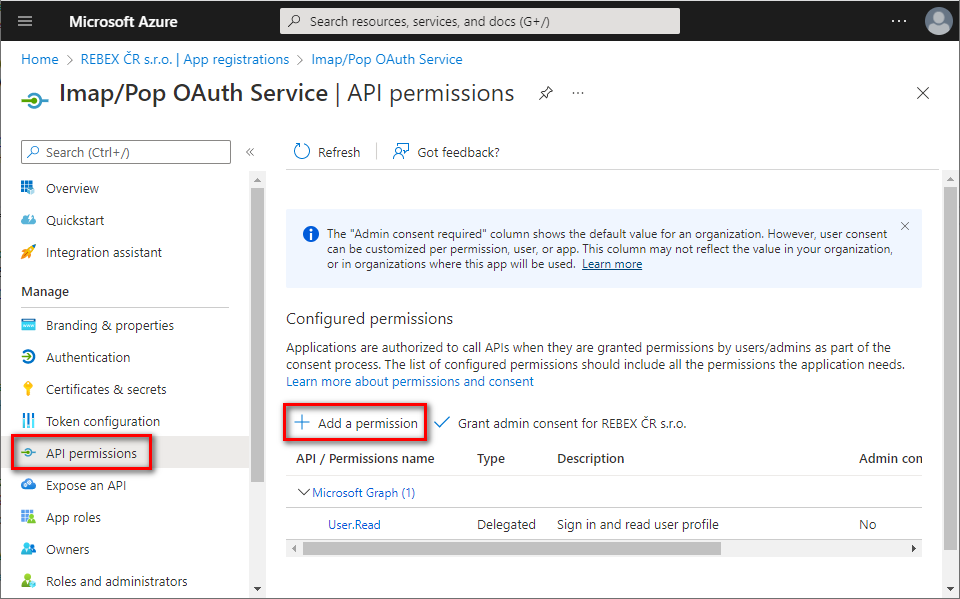
Navigate to
APIs my organization uses tab⇒ typeOffice 365 Exchangein the search bar ⇒ clickOffice 365 Exchange Onlineentry.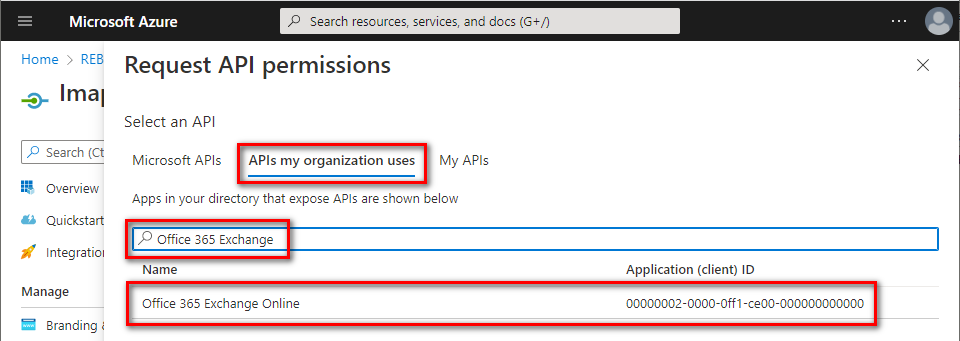
Click
Application permissions⇒ typeAccessAsApp⇒ checkIMAP.AccessAsAppand/orPOP.AccessAsApp⇒ clickAdd permissions.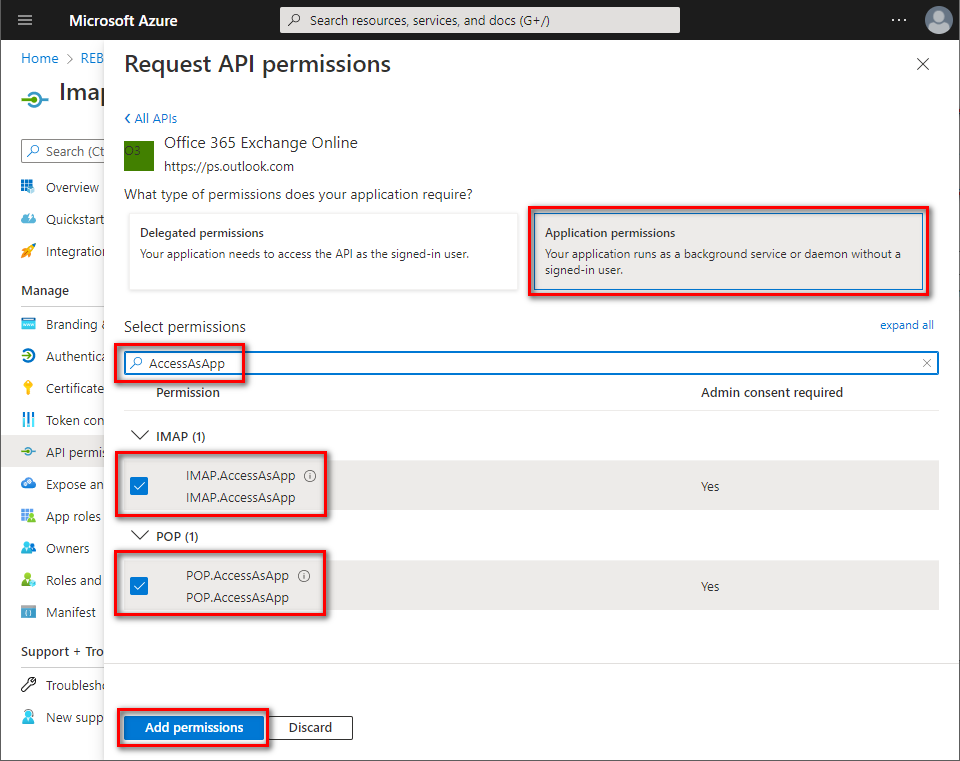
The newly-added
IMAP.AccessAsAppandPOP.AccessAsApppermissions have to be approved by your organization's administrator. Ask them to grant consent to your application by clickingGrant admin consent for [organization].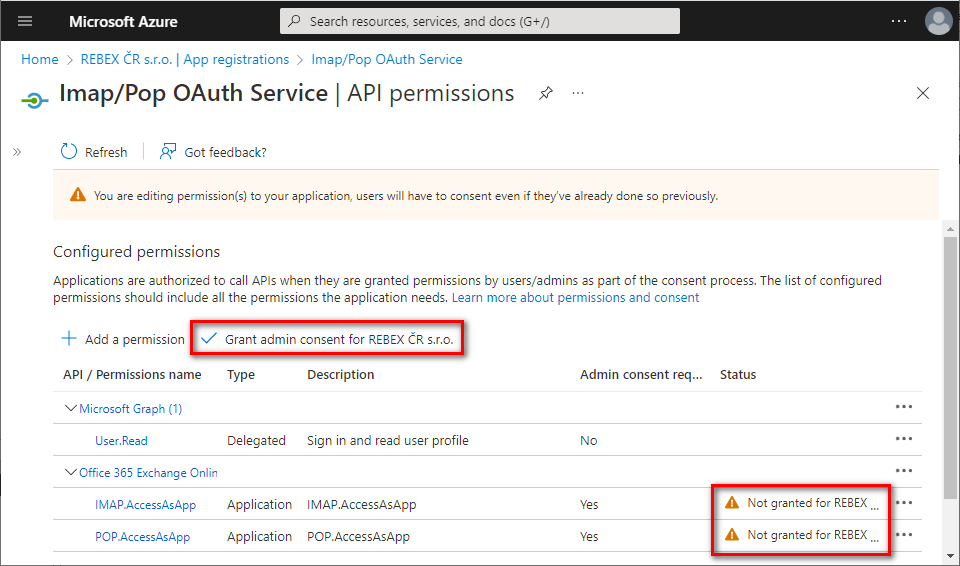
Application permissions have been granted. Optionally, you can remove the delegated
User.Readpermission which is not needed for app-only application - click the context menu on the right side of the permission and selectRemove permission.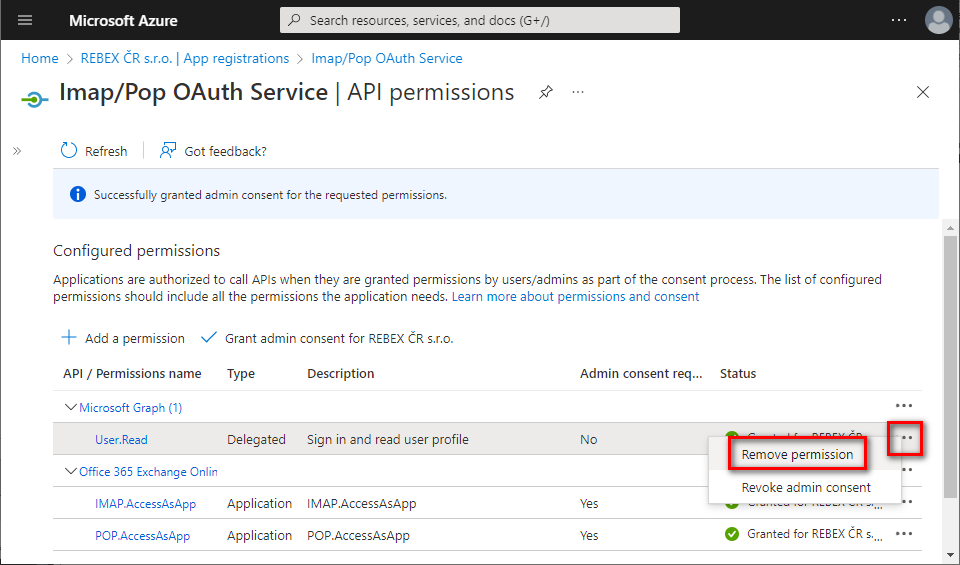
Now, you have to assign access permissions for your mailboxes. There is no web UI for this yet - you have to use PowerShell.
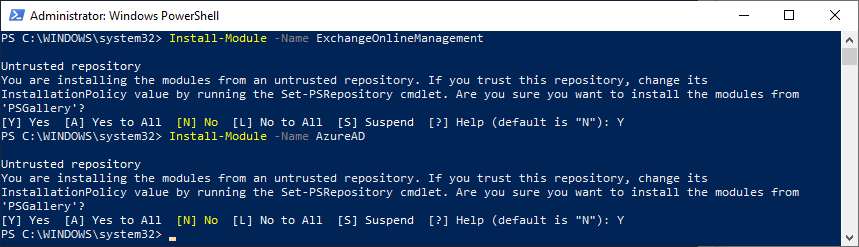
Install the required PowerShell modules.
You can skip this step if you have already installed AzureAD and ExchangeOnlineManagement modules.
Open your PowerShell as Administrator, and run:
Install-Module -Name AzureAD
Install-Module -Name ExchangeOnlineManagement
Confirm installation from PSGallery by typing Y + Enter.
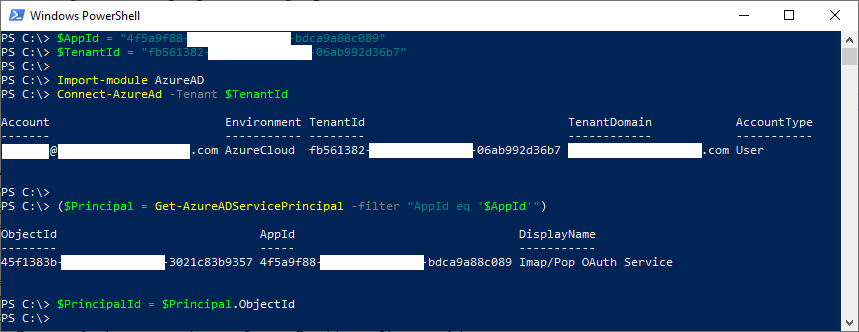
- Get the service principal ID associated with your application.
Note: You will be asked to log into your Azure account.
$AppId = "YOUR_APP_ID_HERE"
$TenantId = "YOUR_TENANT_ID_HERE"

Import-module AzureAD
Connect-AzureAd -Tenant $TenantId

($Principal = Get-AzureADServicePrincipal -filter "AppId eq '$AppId'")
$PrincipalId = $Principal.ObjectId
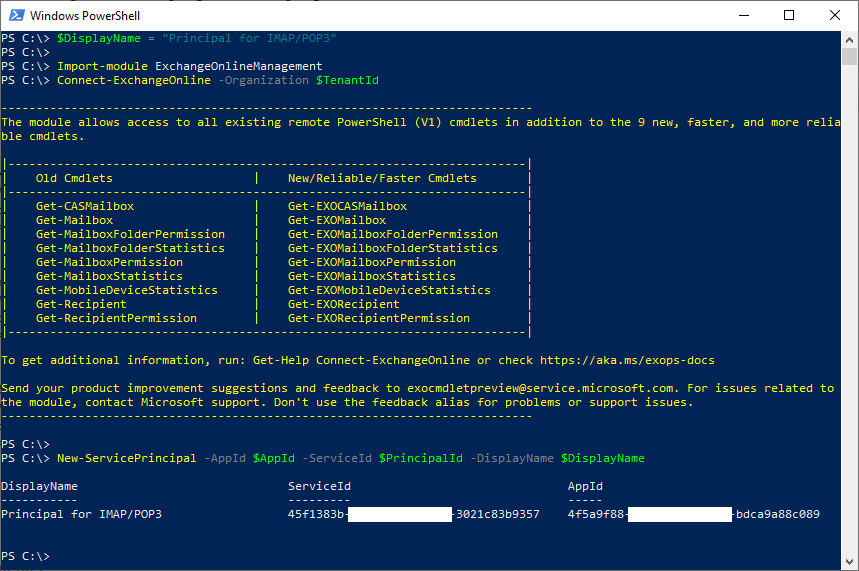
- Register the service principal for your application.
Note: You will be asked to log into your Exchange Online account.
$DisplayName = "Some principal name for IMAP/POP3 here"

Import-module ExchangeOnlineManagement
Connect-ExchangeOnline -Organization $TenantId

New-ServicePrincipal -AppId $AppId -ServiceId $PrincipalId -DisplayName $DisplayName
- Add
FullAccessmailbox permissions to all mailboxes you want to access from your application.
Add-MailboxPermission -User $PrincipalId -AccessRights FullAccess -Identity "mailbox.1@example.org"
Add-MailboxPermission -User $PrincipalId -AccessRights FullAccess -Identity "mailbox.2@example.org"
Add-MailboxPermission -User $PrincipalId -AccessRights FullAccess -Identity "mailbox.3@example.org"

- Congratulations! Now you have registered an application for accessing Office 365 mailboxes via IMAP or POP3 protocol and received its
Application (client) ID,Client secretandDirectory (tenant) ID.
These strings are going to be used by your application to authenticate to Microsoft 365 via OAuth 2.0 and receive an OAuth token. This token is then used to authenticate to Exchange Online using IMAP or POP3 protocols.
Read More
Updated on : 2023-07-28 17:04:09. by : nghianh@spc-technology.com. nghianh at 118.69.187.103.
Topic : generate_access_token_ms365